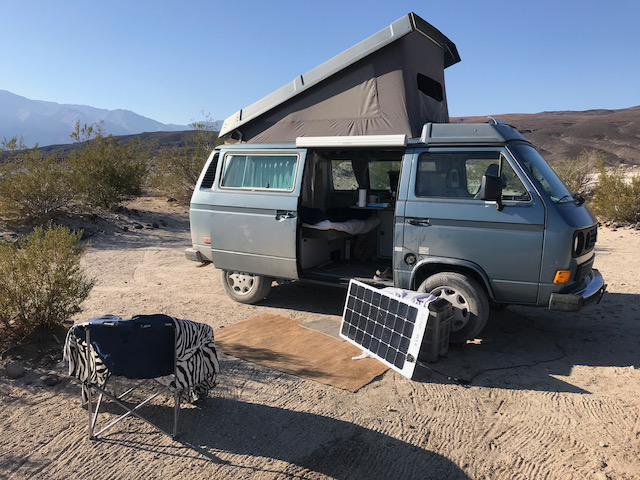
I’ve found a high quality 100 Amp hour Lithium battery that fits under and behind the drivers seat in a Vanagon Westfalia.
EDIT: 1/24/2024, The battery case has changed slightly since I did mine. A friend reports that it still clears the Westie swivel, but with less clearance. I will update this post when we see how the mounting and wiring turns out.
In this post I’ll show you how I made it fit to be used as a house battery in my Vanagon and I’ll provide links to parts used.
I’ve been loving this setup for almost a year. It’s an excellent upgrade that doesn’t use precious cabinet space.

The setup also includes:
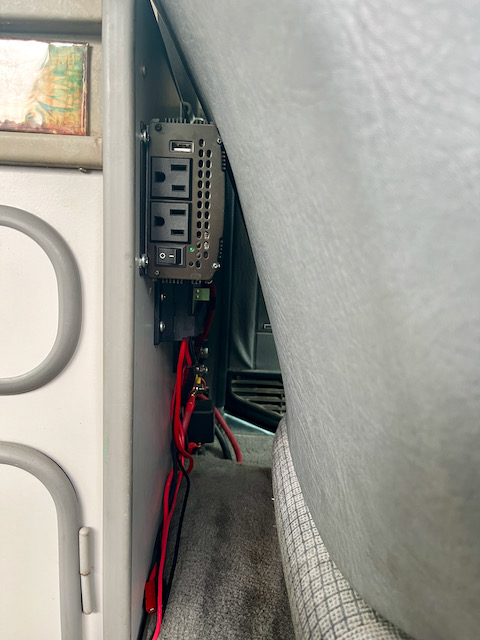
- 750 Watt modified sine wave inverter
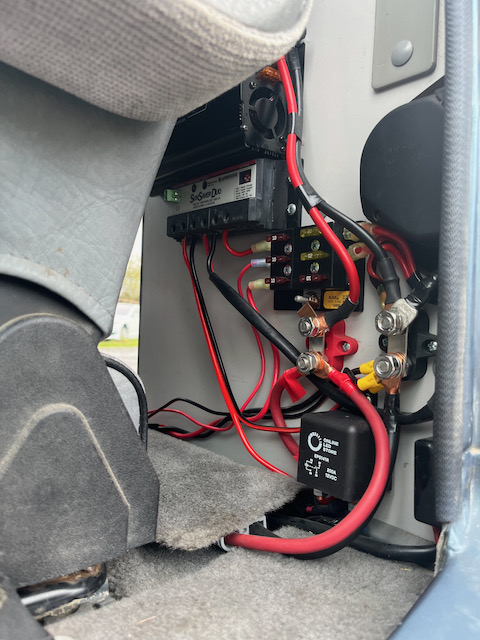
- Solar charge regulator for dual batteries
- Charging relay to charge house battery from alternator
- 6 position fuse block for light loads
- Distribution posts located for easy access of jumper cables
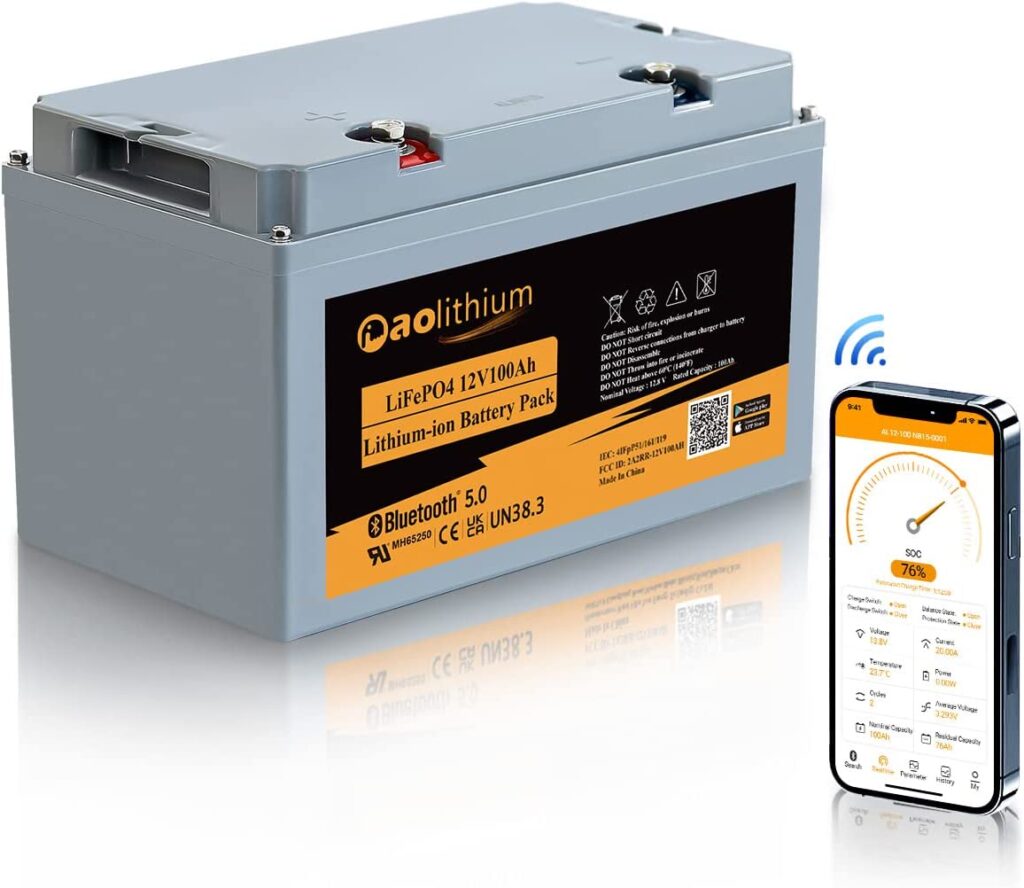
This battery features:
- Safe Lithium Iron Phosphate chemistry
- Bluetooth phone app monitoring
- Freezing temperature charge protection
- 100 Amp hours of capacity
- 12.8 Volts nominal voltage
- 100 Amps load/charge capability
- 300 Amps peak load capability
- Rated for 4000 cycles of long life
- Best of all: Short 7.4″ height to fit under a Vanagon drivers seat swivel
- No cutting of the Vanagon body to fit, it does require drilling out a few rivets to remove the battery cover.
The Details:
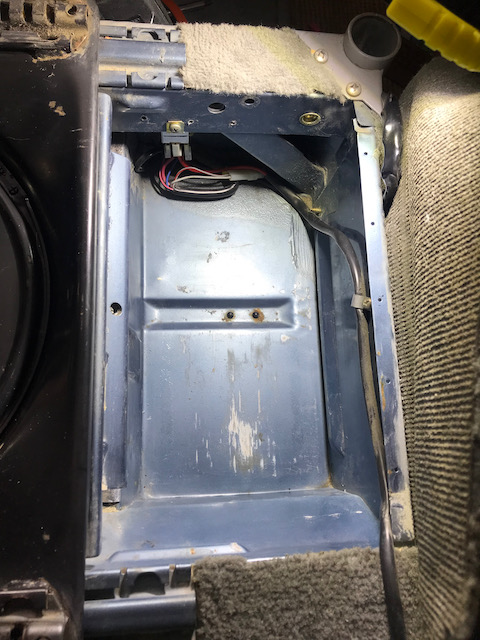
I enjoy making the best use of the limited space in a Vanagon camper. For years I’ve been looking for a 100 Amp hour lithium Iron Phosphate battery that could fit in the left battery compartment and still clear the seat swivel mechanism. I finally saw one on Will Prouse’s YouTube channel that looked like it might fit. It is a little taller than the compartment, and pretty wide so I did have to relocate a few things as shown below.
In order to allow it to fit, I flipped and slightly relocated the factory refrigerator relay providing clearance for the battery. I also used the coil connections from the same relay to drive my larger parallel charging relay.
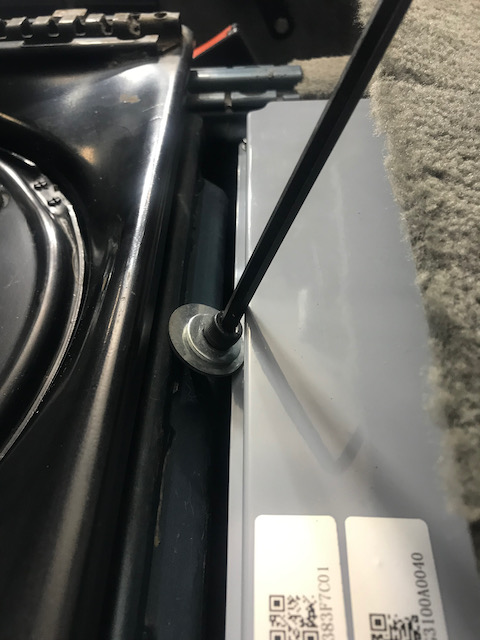
I’ve removed the drivers seat and rotated the seat swivel base 180° in order to provide clearance to access the battery compartment in the image below.
Removed the hinged compartment cover by drilling out the rivets.
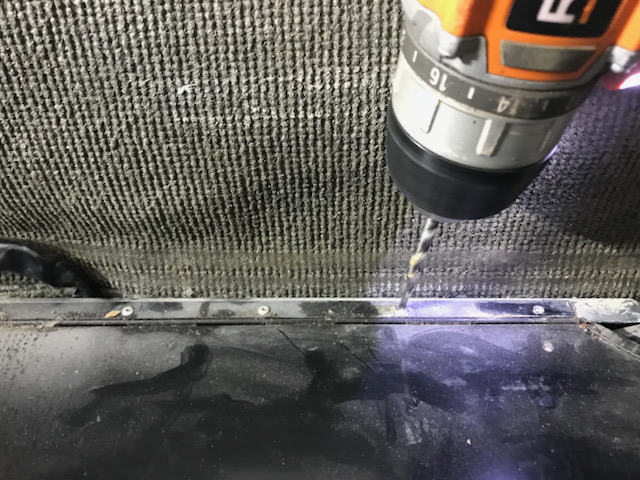
Removed the plastic cover retainer thingamabob.

Stacked a couple 5/16″ and 7/16″ standard washers on a 25mm long 8mm socket-head cap screw from my local hardware store and tightened with a ball end hex wrench to keep the battery from rattling or bouncing.
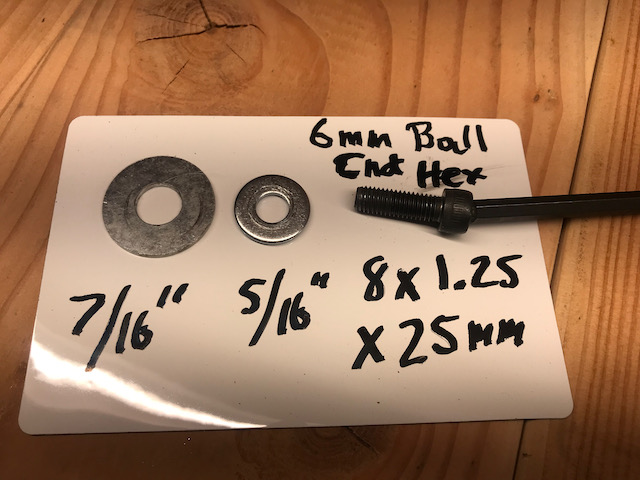
Clearance to the battery case really is close so the bolt length and washer sizes are critical. It requires a ball end hex to tighten it.
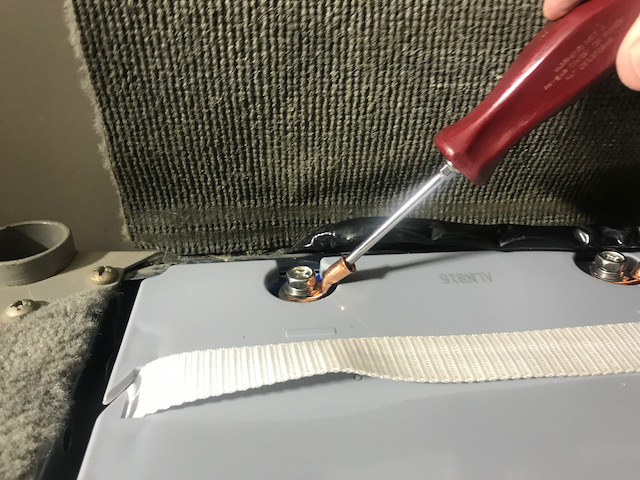
I bent the lugs to allow them to clear the battery, exiting to the side to avoiding interference with the metal lip of the battery box.
I selected 6 AWG super flexible cables to match my 750W inverter max load and and Anderson connector as a quick disconnect for the battery.
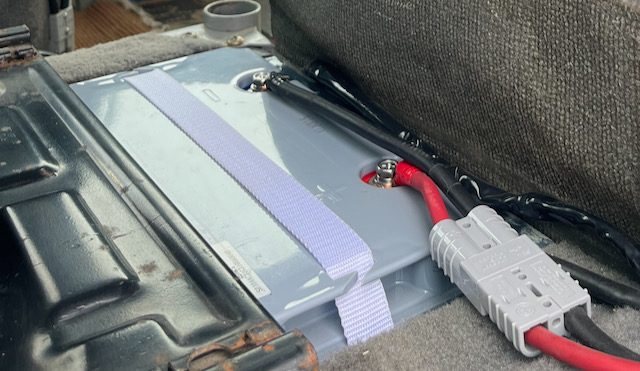
I also used dual terminal posts that are positioned to allow for easy connection of jumper cables without moving the drivers seat. I’d like to make a cover for the positive terminal to protect against inadvertent shorting. Speaking of shorting, in this installation I rely on the BMS (Battery Management Systems) inside the AO Lithium battery to limit short circuit currents on the heavy wiring and jumper terminals upstream of the fuse block.
Helpful comments have suggested I add more over-current protection, so I will add a breaker. The breaker also can act as a shut off to prevent parasitic power draw when the Vanagon is in storage.
The original carpet doesn’t quite lay flat. I think some sticky back velcro would work well to hold it in place. I suspect it will need additional adhesive to hold it to the carpet.
I use a small AC inverter to run a rice cooker and juicer. I found this compact 750 Watt unit that does the job. It’s mounted high to retain storage space, but not so high that it interferes with the fully reclined seat. I measured the quiescent current draw on this inverter at 10 mA when switched off.
The Sunseeker Duo charge controller has been reliable for many years so I also integrated it here. It’s nice that it charges both house and SLI (Starting Lighting and Ignition) batteries from one solar input, but these days there may be newer options.
The distribution fuse block allows easy access for all my loads including a Engle refrigerator, Diesel heater, electric blanket and USB outlets.
The 200 Amp charging relay connects the lithium house battery to the lead acid SLI battery to charge the house battery from the alternator while the engine is running. This is allows for charging faster than solar while driving. DC-DC chargers may be a better/safer option and I discuss them below.
The relay connects to the house battery under the drivers seat through a parallel pair of #10 AWG wires running under the walk through edge carpet to a 80 Amp fuse on the SLI battery. Due to the VW’s low charging voltage of 13.8 Volts this does not rapidly charge up the house battery, sometimes it will even slowly discharge a full house battery if I drive with the lights on. I’ve installed voltage regulator I had on the Vanagon alternator that it puts out 14.5 Volts at the battery. This is better for both batteries. There is a potential risk of overheating the alternator from continuous high current, especially at idle when cooling is low. As of this writing I see 14.5V voltage regulators at Bus Depot.
When using a relay instead of a DC-DC converter, the charge current will be highest when the house (Lithium) battery is empty and the vehicle headlights are off. I recorded currents at various states of charge in my setup with the 14.5 Volt regulator installed. Initially this charges faster than a 25 Amp DC-DC converter would, and puts more load on the alternator, but once the battery is over 25% full the DC-DC system would provide a faster charge.
| State of Charge % | Amps |
|---|---|
| 0 | 73 |
| 1 | 68 |
| 3 | 49 |
| 5 | 37 |
| 10 | 33 |
| 25 | 22 |
| 67 | 18 |
| 89 | 17 |
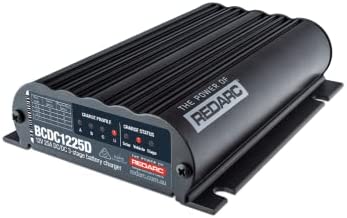
If faster charging while driving is important and you want to limit the stress on your alternator, a DC to DC charger that boosts the voltage of your vehicle charging system to optimally charge the house battery while limiting the maximum current to avoid overloading the alternator may be worth it. This would be used instead of the above 200 Amp relay. The 25 Amp rated REDARC BCDC1225D above has great reviews and seems to be high quality and costs accordingly. It has the added benefit of a built in MPPT solar charge controller. This would only charge the house battery from solar, not the vehicle SLI battery like my Morningstar controller does, but it removes the need for the solar charge controller.
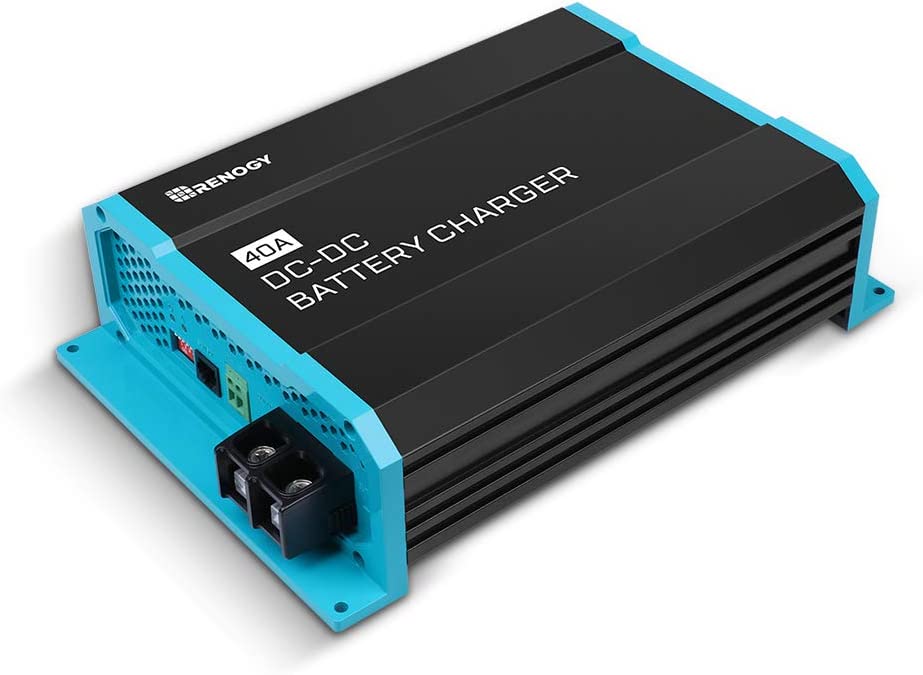
Renogy makes simple DC to DC chargers that are less expensive. This 40 Amp would charge faster, but also may be pushing the limits of the alternator output capacity. Their 20 Amp unit may be safer for the alternator and a reasonably priced alternative albeit without solar input.
For crimping the lugs, I’ve used an inexpensive hammer crimper in the past with good results, for this project I enjoyed splurging on a hydraulic crimper. Not required, but nice and controlled.

Below are a list of (paid) links to the parts and tools that I used in the project. Links open in new tab:
- AO_ Lithium 100 Amp Hour Battery https://amzn.to/3Xij1Px
- INVERTERTEK 750W Power Inverter https://amzn.to/3iHbvPd
- 200 Amp Charge Relay https://amzn.to/3IXEoBs
- 80 Amp ANL Fuse for SLI Battery Connection https://amzn.to/3wfo8o0
- Dual Terminal Block Set https://amzn.to/3Whx9r1
- Anderson Connector for Battery https://amzn.to/3J0OEsU
- This 6-Way RV Fuse Block has a cover, unlike mine https://amzn.to/3ZJVYin
- 6 AWG copper welding cable https://amzn.to/3kt1buP
- 1/4″ 6 AWG Terminals for Relay https://amzn.to/3GUvO3E
- 5/16″ 6 AWG Terminals for Battery, Terminal Block and https://amzn.to/3CZcaCE
- Ball Hex Key Wrench Set https://amzn.to/3QU1sDk
- Hydraulic Crimper https://amzn.to/3XHs3pi
- Low cost Hammer Crimper option that also works well https://amzn.to/3GOtA65
- 14.5 Volt Regulator for Alternator at Bus Depot
- REDARC BCDC1225D battery charger option https://amzn.to/3WrwfYZ
- Renogy 40 Amp DC to DC charger, also 20 Amp available https://amzn.to/3iIJVkR
- Sticky Back Velcro for the carpet https://amzn.to/3kl1bwJ
This site contains paid links, by buying through these links I may receive a commission for the sale. This has no effect on the price for you.
Feel free to leave questions or comments below, I’m happy to discuss it.
Great information – Thank you for taking the time to put this very informative article together.
Clear and concise and complete with alternatives. Thanks for this. I’ll share this with a friend who has a van.
A super usefull feature,beautifully documented. Thank you Otmar! Debbie H
Hi – I have a similar setup but with 2 100ah lithium batteries connected in parallel and 50 amp DC-DC + MPPT charger, but I want to add one or two 12v socket plugs like these https://no.co/gc018 but I’m confused as to where I would connect these.. any advice?
Thanks.
Jay
I can’t be sure, but I imagine connecting the wiring directly to the batteries as shown in the instructions for the adaptor would be fine.
If there’s doubt I’d suggest finding someone knowledgeable to look at it in person with you and see what the best connection would be,
Otmar, thanks for yet another wonderful write up of one of your projects. I have my 100 amp hour lithium battery, charging off of my alternator using a 50 amp DC to DC Renogy charge controller and a 200w Renogy panel.
The point you raise about heating up the alternator without a voltage regulator had me a little concerned.
I have an ‘upgraded’ 110 amp alternator on a Subaru EJ 2.5. I see it running at 14.5 V when at startup and then settling down to 13.8 +\-. When fully charged the battery rest’s at 13.3v on my digital read. So far so good and it’s been a couple of years, so I’m assuming all is well with my alternator and system. I do have a small ‘voltage’ regulator mount on the alternator.
Hi, very useful article and well done. When you say « If faster charging while driving is important and you want to limit the stress on your alternator, a DC to DC charger that boosts the voltage of your vehicle charging system to optimally charge the house battery while limiting the maximum current to avoid overloading the alternator may be worth it » does it mean that the need of a adjustable Voltage Regulator for Alternator is useless in this case? I have a solid 13,7 13,9 volt from my alternator.
Good question!
The DC to DC charger will take care of charging performance on the lithium house battery.
Theoretically, increasing alternator voltage would still slightly reduce load on the alternator since higher voltage into the DC DC charger reduces current draw, and higher voltage may be better for charging your SLI battery, but I would not consider it a significant improvement.
Thx for the article. You answered a lot if my questions. I am installing two 100ah aolithium, with a 30 amp Renogy dc to dc and mppt controller to house and SLA starter battery. Renogy says it includes an isolator. Do I need to take out my current Gowesty battery isolator before using it?
Yes, If they work as I suspect, I believe it is important to remove the GoWesty isolator before connecting the Renogy one.
Would raising the swivel plate and thereby the seat a little help any clearance issues for LiPo batteries or is there a reason no one does that?
Raising the swivel and also the seating position may be possible, but is something many of us do not desire. I drove with non-swivel front seats in a Westie for years (Westie seat bases are about 3/4″ lower to compensate for the swivel) and I did not enjoy the higher seating position. That’s why I was so glad to find a battery that fits under the stock swivel mechanism.
I have installed a Renogy 60 Amp DC-DC charger, with a new AO Lithium 100A battery, following Otmar’s excellent instructions (battery fits nicely, a bit tall but no worries), so here’s what is happening with my project, 1986 VW Vanagon weekender with a Subaru EJ 25 motor.
I ran the van (Subaru EJ 25 alternator with 230K miles) and at first it ran fine. The DC-DC charger made noise, but as I test drove more miles, the house battery charged, and then the start battery (Interstate, which worked fine), was dead. Able to jump and isolate the house battery, on the road again. So…here’s questions as to why this system is not working;
1. OEM wiring from start battery to passenger area (DC-DC charger) is 6AWG?, I am using all new 4AWG, I am going to rewire the connection to be continuous 4AWG wth a 80AMP fuse, from the start battery to the DC-DC charger, then I’ll be using 4AWG wire in the whole system, as Otmar did This would guarantee no opens, shorts or current loss in that connection. Could I be getting too much resistance from the OEM cable?
2. I have a high output alternator (new), in the shop, I’m going to change wiring first (see above), then move to a higher powered alternator, first things first. Is that old OEM Subaru alternator not doing enough work? I’m going to change that alternator anyways, but it powers the van fine right now, one step at a time is what I say.
3. Once I disconnect and run on just the start battery, I show 13.4 volts on the scan gauge and the system runs normal.
3. Could I be seeing a current draw from the 12V DC trigger, be nice to know where people are getting the “run postion” power, could I have a problem there? Shows good voltage when the key is in the on and running position.
4. My house lithium battery now shows 13.7 volts on a multimeter, when isolated.
5. Seems the Renogy owner manual is incorrect with the DIP switches, searches through the internet still have me questioning positions. What’s right, is that where the problem lies?
It just seems that I can’t power through that DC-DC charger. I am thinking I might just install the relay that I also ordered, see what happens there. By pass the DC-DC charger and look at results. That is the way Otmar set up his system, without the DC-DC charger, just a relay.
I am puzzled, the van drives fine, but I have isolated the start battery, now no radio, interior lights, all the other items that the house battery powers.
This is not an everyday driver, so I have time, but advise would be greatly appreciated.
I work alone in rural Wyoming, Sorry to be long winded, but I moved slowly through the project and sometimes work like this doesn’t go easy, there is an answer out there, is someone else out there that is having my problems?
Thanks
Chris Peck
Glad to hear that the battery is fitting well for you Chris,
Sorry to hear of your struggles.
I’m not very familiar with the Renogy DC-DC, maybe someone else who knows more can chime in?
Going by what you say, that after installation your starting battery was discharged, that makes me suspect that the Renogy DC-DC is staying active for some reason. I would look for some sort of indication that is has actually stopped transferring energy from the starting battery to the house battery within a few minutes after shutting off the engine. Is there an LED or maybe a phone App that would help verify that?
ps: I just noticed you are running the radio and lights off the start battery. I wonder if that could open up some potential for crossed wiring between the two systems?
Wishing you luck in finding the issue.
I’m running interior lights and radio of the house battery,
Once that DC-DC charger is disconnected, the headlights, and all systems
work perfectly,
I really appreciate the follow up,
Thanks so much, I’ll keep posting once I solve the problem
I am curious what you did to cap the 12V terminal on the battery? I just purchased the same battery after reading your review (thanks). Already drilled out the rivets to remove the factory lid. My van is a tin top Carat with no driver’s swivel, I’ll have to be creative where to mount the fuse panel, solar MPPT, etc.
I just let the carpet cover the terminal.
Admittedly, it would be good if I used a plastic cover on all my hot connections.
In the past, I’ve used liquid electrical tape or tool dip for insulating odd shapes like this.
https://amzn.to/3Nc9o1Q – paid link
Love the battery under the seat!!
Battery sizes are getting smaller. Can you please tell me if you are satisfied with this specific brand of battery. The price has dropped drastically. I’m thinking to do exactly as you have done.
Does the drivers seat still swivel with that battery in place? No chance of a short?
On my main battery side, I cut a part of the swivel out so I can easily lift the battery out after sliding the seat forward. Maybe I will do the same on drivers side.
I originally found you post on thesamba, which brought me here.
Thank you.
I’m still very happy with the battery and setup. I noticed the reduced prices, glad to see that.
The seat swivels fine with plenty of clearance. It also helps that the terminals are recessed so they won’t cause a short.
For battery access on both Vanagon swivel seats, as long as you remove the seat from the swivel it’s you can fully swivel the base 180 degrees. The base is shorter on the front and that allows full battery access without having to modify or remove the swivel base. Have a look at the photos above, I never did remove the swivel for access, only turned it around with the seat removed.
I hope it all goes smoothly.